up·cy·cle
/ˈəpˌsīkəl/
-
reuse (discarded objects or material) in such a way as to create a product of higher quality or value than the original.
Taking something old and making it new again is a feel-good, be-proud-of-it, saving history, kind of project. Beyond the shabby-chic movement, saving old things just feels good. Upcycling is about finding something broken, having a vision, creating something new, bringing it back to life, and giving it a story. So before you toss out a broken chair or take that 1970’s coffee table over to Goodwill, give it a good look to see if it would be the perfect upcycle story to tell!

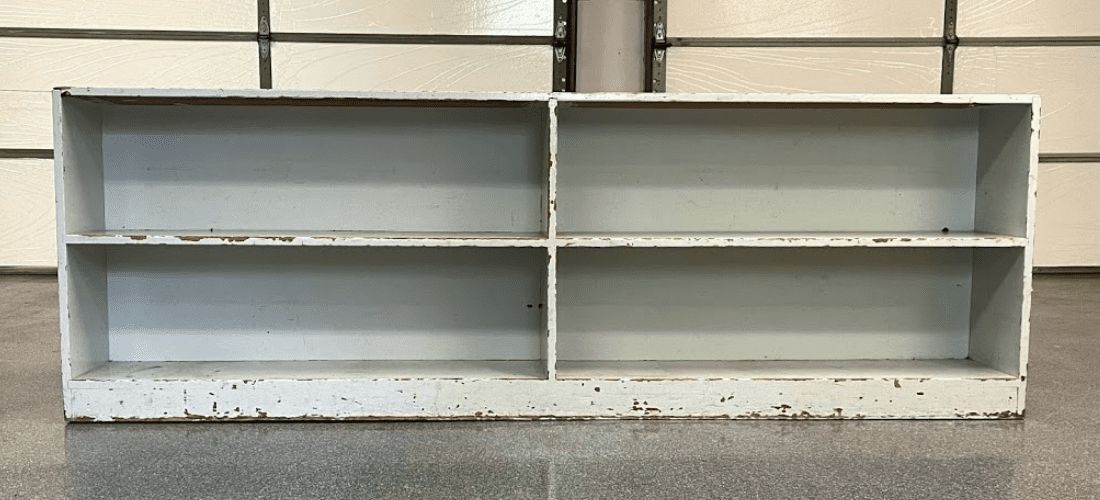
My daughter works at a K-8 grade school as a school counselor. She moved into her classroom a few months back and realized that it wasn’t just the kids who would need a lot of love and attention. The room had been vacant for a while and was full of things no one wanted anymore. It was messy, it was disorganized, and it needed help. She’s been doing the entire design herself and reached out to me to see if there was anything I could do to one of the bookcases she inherited from the previous teacher. The condition was so sad that the custodian offered to throw it out for her. But luckily she knows that magic can happen with power tools, a paintbrush, and a little imagination.
It didn’t hurt that the piece was pretty solid. Seven and a half feet of pine handwork. Whoever built this meant for it to last. It was a little beat up, had seen better days, but with some new paint and a little work, it would come back to life!
We all know that public schools and teachers don’t receive the funding for everything they need and that teachers and staff often use their own money to create an environment that the kids can thrive in. If I can help her to provide a safe and soothing place for the kids to receive counseling, as silly as one bookcase may seem – I’m all in!


Choosing Paint


Paint comes in different sheens, choosing the right one for the right application is almost as important as your color choice. For this project I went with a satin. I didn’t want it really glossy, but needed it to be cleanable. And the less glossy finish added some needed texture.

The Inspiration
On Mother’s day, my daughter and I headed over to Home Depot to look at paint swatches. Her choice of color came from Dr. Seuss. So, the cover of Oh, The Places You’ll Go! decided the paint. She chose “Touch of Blue” by Glidden. Thank you Home Depot, and YAY for Dr. Seuss! Also, YAY for mother’s day and trips to the hardware store! 🙂

Two-tone
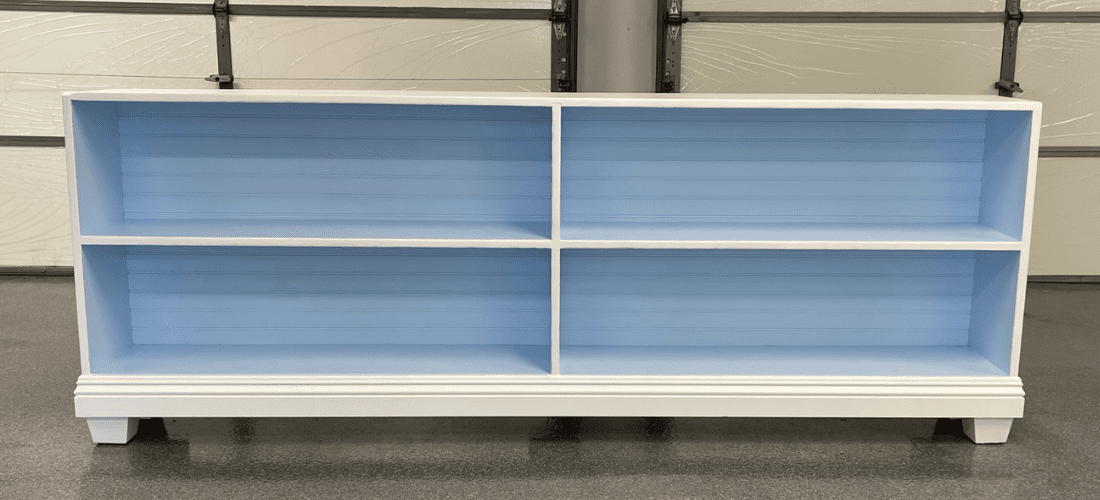
I wanted to create something special, and I thought two paint colors for depth and interest would look great. We could have used any colors from the Dr. Seuss book but since my daughter wants her room to be a calm and restful place for the kids, we chose white to offset the light blue. ahhhh, peaceful!

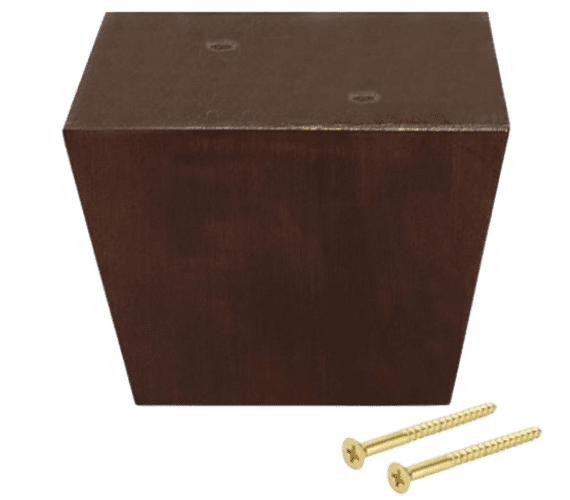
For added interest, I decided to add a beadboard backing, (for texture) and furniture feet. (for sophistication) Because of the length of the bookcase, they needed to be large enough to hold the weight and to balance the size. I found 4″ sofa feet on Amazon, knowing I’d have to paint them to match. They worked out perfectly!
Getting the process started

- After removing the original backing, the new beadboard needed to be cut to size. Using the old backing as a template, out came the circular saw.
- Sanding down the pieces was next. My Makita random orbit sander did a fantastic job! I used 80 grit sandpaper for this step. Side note: Since this wasn’t an heirloom piece and it wasn’t going to be stained, I only sanded it enough for a smooth(ish) finish. Refinishing with stain is a different process using paint remover or wood stripper chemicals.
- Next, I primed the bookcase and feet. After priming, I sanded with 220 grit sandpaper to get an extra smooth finish. (When sanding by hand, sand with the grain) The trim and beadboard wainscot came pre-primed, so those I could just paint straight away. Yay, one less thing to do!
- Now to paint the entire thing! I knew which sides I wanted blue, and I “framed” the rest with the white.


Let’s talk trim

- I wanted the bottom of the bookcase to have some detail to it. I chose 4″ high baseboard from Home Depot, to wrap the bottom. I needed about 10′ total and the piece was 14′, giving us a little bit of room for any small cutting errors.
- For the finished carpentry segment of the project, I enlisted my husband’s assistance. He installed our entire 2,000 sq. foot house worth of door, window, and base trim, so I knew he could knock this out in no time! We brought out the compound miter saw and started our 45-degree cuts.
- When dry fitting the trim, we realized that the bookcase sides weren’t exactly squared, so the pieces didn’t align perfectly, but given that this was probably a 30 years old bookcase, I’m going to call it a win.
- For another power tool to have in your arsenal, I recommend a finish nail gun. The trim was installed super quick and we never had to pull out the hammer. And someone somewhere was clever enough to combine a finish nail gun and a staple gun. And who doesn’t need a staple gun with an extra purpose?


5. Next we added the feet (we should have done this first, since it made screw holes I had to putty and paint over again)
6. Since we removed the back panel (I kept all the original nails to use later) it was time to add the newly painted beadboard panels to finish the project. I didn’t want to use the nailgun for this, since the nails could possibly shoot out through the side, if I wasn’t really precise. Basically, with a hammer, I had a little more control to keep the nail within the narrow area I had to work with.
6. Ta Da! It’s finished and I can’t wait for my daughter to add it to her classroom for years of enjoyment! Oh, The Places We’ll Go!
")
- Find your project piece to paint (staining requires additional steps and is a slightly different process) Thrift stores, garage sales, flea markets, FB Marketplace or Craigslist are great sources to find a project piece, for little to no cost.
- Envision the end project (Pinterest is your best friend for this)
- Prep your workspace. Use a dropcloth and keep a damp cloth nearby to clean up any drips or paint splatters that end up where you don’t want them.
- Prep your piece Clean and repair any necessary damage. Using wood putty to fill in any crevices or small holes. Follow the instructions for drying times.
- Get out the sandpaper and sand everything thoroughly. This is a dusty process, so make sure you’re in a well ventilated area and wear a mask. Using an electric sander is the fastest way to get this part of the prep done. When choosing sandpaper grit, the lower the number of sandpaper, the rougher your surface will be. 40-50 grit is very coarse, 220 will gently sand. Work your way up from course to gentle. follow up with a damp cloth or tack cloth to pick up any dust
- Using a roller or paintbrush, paint your furniture with one coat of primer (it does not cover as fully as paint, so don’t worry if the wood shows through) Not sure which brush to use? click here
- Using 220 grit sandpaper, lightly hand sand over the primer, to get an even smoother finish. Do not use a motorized sander for this step, you want a light touch
- Go over the project again with a damp cloth or a tack cloth to pick up any remaining dust particles
- Using a paint/primer combo, use a roller or brush to paint your piece. Your typical “one-coat” coverage usually needs two coats. It depends on the color and sheen. Once dry you can see if it needs a second coat. Let fully dry in between coats
- Paint and add any embellishments, trim, furniture feet or legs, etc.
- Caulk where necessary to cover any gaps where you added trim (you may not need this step)
- Enjoy the fruits of your labor! You’ve just created a beautiful upcycled masterpiece!


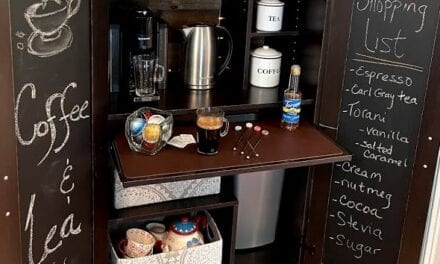
A few other DIY projects
This list is continuously growing, blog by blog. My hope is that you find something enjoyable to show off your talents and maybe learn a new skill, all while having fun!
")
Join
Don’t miss out on new DIY projects
This post may contain affiliate links. Danelia Design is a participant in the Amazon Services LLC Associates Program, an affiliate advertising program designed to provide a means for sites to earn advertising fees by advertising and linking to amazon.com. For more information, please read my disclaimer here.


