")
Coastal Design
Organized beach living, even if there is no beach for miles around!
Hang your towels, hang your coats, hang your suit, trunks, or bags. Indoor or out, these adorable whale tail hooks will make a splashing statement!
This project idea was born out of the need to organize the damp pool towels that end up strewn over patio furniture after a day of swimming. My messiness tolerance is fairly low and I sleep better knowing things are in their place. I have a love for organized things and when those things can fit into a theme, I’m even happier!
I love the beach, I love being near the crisp and clean ocean air. I love the feel of warm sand and the momentary shock of the chilly Pacific Coast water as the waves break at my feet. Since moving four hours away from the ocean, it feels like home to bring some of the coastal vibes into my everyday life.
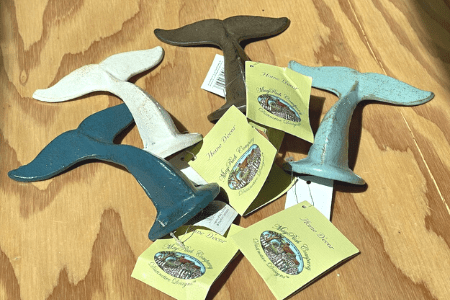
The Hooks
Any style hooks will work for this project. I’m using this project near the pool to hang towels and such. You may have another idea in mind, and the following images were the other options I considered. For these coastal-colored whales’ tails, click here.


")
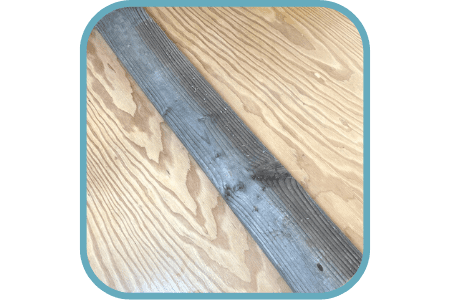
The Lumber
You’ll need a 2×6 board cut into a 3-foot length. (The big box home improvement stores will do the cuts for free) Or use scrap wood you already have, but make sure it is thick enough to hold the weight of the cast iron hooks with a 1-inch screw depth.
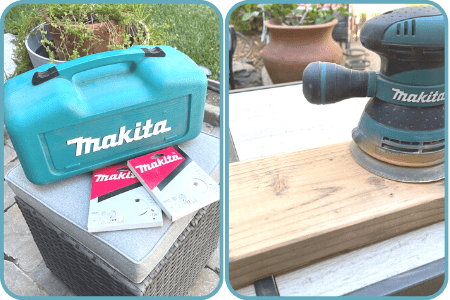
The Prep
Sand your board to prepare it for paint. I love my Makita orbital sander, (click here to buy) but hand sanding is perfectly fine. And if you skip this step altogether, because your board is smooth enough, no one will ever know!
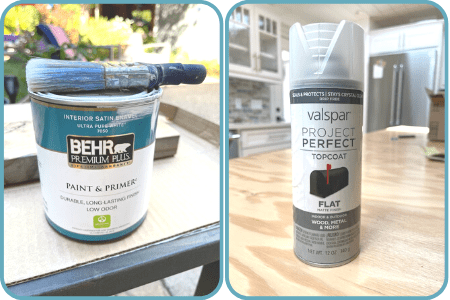
The Paint
Chose your paint based on whether you’ll be using this outdoors or inside. I already had a can of interior white paint & primer that I’ve used for other projects, so I made sure to seal it with an outdoor-rated clear topcoat. For the blue accent color, I used Sherwin Williams Bunglehouse Blue with an eggshell finish. It’s one of my favorite dark teal shades. So much so, that both my husband and my offices are painted this color. Oh, and so is the back wall of the hallway. I can’t stress enough how much I love this color! And don’t forget to add the topcoat when you’ve finished painting!!

The Technique
Begin with 2 coats of white paint & primer. I did not paint the backside, since it will be installed against the wall. To achieve the “coastal weathered” look, start with a dry brush, dipped in a dark blue, dark gray, or dark green, and lightly move the brush across the surface of the board. (A dark paint against the white background gives contrast) Barely touching and dragging across in one long stroke after another will do the trick. Repeat for the other sides & ends of the board. Depending on how heavy or light-handed you are, you will achieve different results. And if you aren’t happy with it, just let it dry and start all over with the white paint!

The hardware
The whale tail hooks did NOT come with hardware. Which is fine. They don’t know what I plan to do with them, or what surface I’m adhering them to (drywall, wood, concrete) so make sure you choose the right size screws for your particular application. Look for #8 wood screws in a 1″ length to connect the hooks to your board. You’ll need to pay attention to using the correct screws to connect to the board to an exterior wall surface, fence, or interior drywall.

X marks the spot!
Evenly space and line up your hooks and mark each hole with a pencil or an awl. Predrill a pilot hole for your screws. Note: The pilot holes need to align with the screw holes in the tail hook – they may not be level with the board. For the hook to level, it’s important to pre-mark the hole locations ahead of drilling. Finish by screwing in each hook to the board. Drill bit tip: Make sure the bit is sized appropriately. Here’s an article about choosing the correct size drill bit.
The Last Step
When you’ve chosen your location, you’ll need to ensure this heavy project won’t fall down! Use sturdy screws deeper than the board to attach to your wall or fence. If using on drywall, use drywall anchors or molly bolts. Follow the instructions on the package for the appropriate application. I was screwing into wood siding, so used 3″ long wood screws. I evenly spaced them, predrilling 3 holes ahead of time in the locations to insure the board was level.
Optional Detail: Paint the screw heads to blend in
")
I can see this at a beach house, near the pool, in a bathroom, or near a doorway. Use it for coats, beach bags, towels, suits, goggles, pet leashes, bbq tools, throw blankets, scarves, jewelry, purses, or hats.
The uses are only limited by your imagination!

")

Beach Towels
30″ x 60″ – 6 Pack

Giant Inflatable Flamingo

10″ long Family Pool

Big Joe Lazy Lounger
→NO POOL? NO WORRIES!←
There are plenty of ways to stay cool when the summer heat hits!

")
Join
Be the first to hear about new DIY projects
This post may contain affiliate links. Danelia Design is a participant in the Amazon Services LLC Associates Program, an affiliate advertising program designed to provide a means for sites to earn advertising fees by advertising and linking to amazon.com. For more information, please read my disclaimer here.


0 Comments