Glass Breaker Witch
")


")
If you don’t believe that sorcery and witchcraft exist, this spooky witch breaking out of a world where she was banished over 300 years ago, might convince you otherwise!
Muahahaha!
")
")
Find Your Materials
I had a vision of a witch stepping out of a mirror, much like the “ghost breakers” you can buy for your windows on Halloween. I have seen Pinterest posts for skeletons coming out of mirrors, but I haven’t seen anything like this. So I thought I’d give it a go!
I found a tall mirror at Goodwill for $7 and the witch came from Amazon. She’s only about 40″ tall making a smaller mirror a great substitute. If you go smaller, her head and leg could hang outside the frame, for a super cool effect. This was the mirror I found, so this is what I used.
")
How to make her look a little less like a cartoon and something that might scare small children
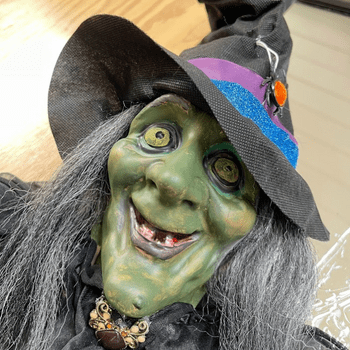
Paint Her Face
Using simple craft paints, I chose a dark olive green for her face. I lightly painted and rubbed it with my fingers, letting some of the original skin tones show through. Her eyes were a blend of yellow with a touch of black. Her lips went from red to black and I dirtied her teeth with a little brown and red. With a dollop of hot glue, I added a mole to her chin and painted it green to match her face.
Paint Her Hands
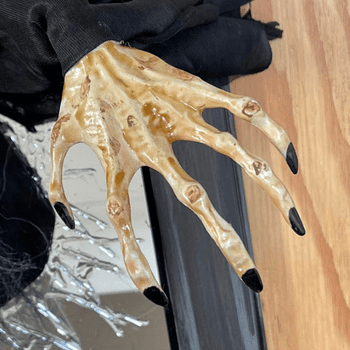
To age her hands, I used wood stain. This was a combination of stain & polyurethane that I had left over from a project a while back. Specifically, Minwax Polyshades in Honey Pine. It not only aged her hands but also gave them a shiny, onion-skin-like appearance. I added a few brown paint spots and painted her nails black. I couldn’t be happier with how old and creepy they turned out!
Paint Her Shoes
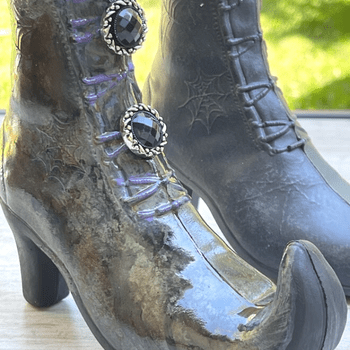
Carefully remove the shoes from her fabric body. I only needed to paint one shoe, since that was the effect I was going for. Here they are side-by-side. I dabbed on brown and black craft paint and added purple for the laces. I followed up with the same polyurethane that I used for her hands to give the boot a shiny leather look. Lastly, I hot glued on fancy buttons.
Adding some brown, gray, and black paint, I rubbed streaks down her gown in an attempt to make it look like she had been in a very grungy place for a long time. I also could have added more or ripped the fabric edges a bit for a better effect.
")
")

Measure about 9 inches down from her shoulder (or where you think her belly button would be) and cut her dress in half. This gives enough fabric for her waist up, as well as enough to cover her leg as it makes its way out of the mirror.
 (1)")

Dollar Store Ghost
You’ll need a 6″ half-round styrofoam ball or half egg to go under the witch’s body and secure her to the mirror. They are anywhere between $6-10. I found these ghosts at the dollar store and they had exactly what I needed!
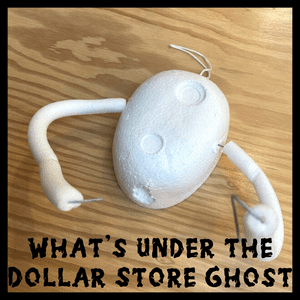
Under the Ghost
Remove the fabric from the ghost. The body contains everything you’ll need to put your witch together. If you need to purchase these items, look for a 6-8″ half-round styrofoam ball, 12-gauge wire (or a wire hanger & a snipping tool), and a pool noodle.
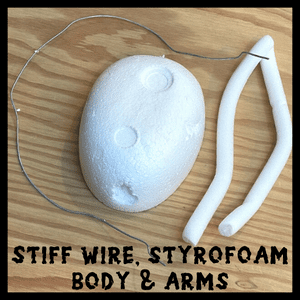
Separate the Pieces
Cut the wire in half (into two 12″ pieces) and set your pieces aside.
→No matter where you source your materials, keep in mind that she needs to stay as light as possible. You don’t want 7 years of bad luck by breaking your mirror!
Her hat needed help, too. It just flopped down, lifeless and sad.
Using the pieces from the dollar store ghost, work with half of the arm and 12″ of the stiff wire. I inserted it in the hat, added some stuffing, and was able to adjust it in any way I wanted. It now stood up on its own.
Since the witch is meant to be hung up, there is a small string on her hat – I glue gunned a small orange jeweled spider so it looks like the string is part of its web, and the spider is making its way up her hat.
I had some blue glitter ribbon, so I embellished the hat to give her a little sparkle!

The shiny black mirror frame was too ’90s for me. I wanted to give it an aged look. Using black, gray, and brown craft paint, I used light brush strokes to blend the colors over the original shiny frame to create the wood-like appearance.
 (2)")
Making The Vision Come To Life
- Reference the images below to create the witch’s leg using the arms from the Dollar Store ghost, the wire, and slices from a pool noodle.
- Attach the styrofoam to her body using a hot glue gun. Her head was a bit floppy, so I attached a piece of wood to better secure her to the styrofoam. (A section of a paint stick or a wooden chop stick will work) The styrofoam not only gives her a body but will “push” her out of the mirror.
- Adhere the styrofoam body and leg to the mirror using epoxy glue. She may fall off if you only use a hot glue gun. Epoxy takes 24 hours to set and a full week to cure. Find a place you can keep your mirror undisturbed until you’re ready to hang it up.
- Using clear epoxy will create a broken mirror effect. Drawing or using it like a pen, outline around her body and leg, as in the image below.
")
")
")

")
Witches, wizards, and Webs, OH MY!
→ Add the remaining fabric to cover her leg, letting some of it drape downward. A glue gun will keep it in place.
")


It’s Only
Magic!
Setting the scene for your break-out evil witch only requires a wall and the perfect lighting. Flickering candlelight can be mimicked with battery-operated candles for a safer display of wickedness!
Let’s do some shopping! Click the images below to head over to Amazon.


This post may contain affiliate links. Danelia Design is a participant in the Amazon Services LLC Associates Program, an affiliate advertising program designed to provide a means for sites to earn advertising fees by advertising and linking to amazon.com. For more information, please read my disclaimer here.


0 Comments