Your own personal
Art Show
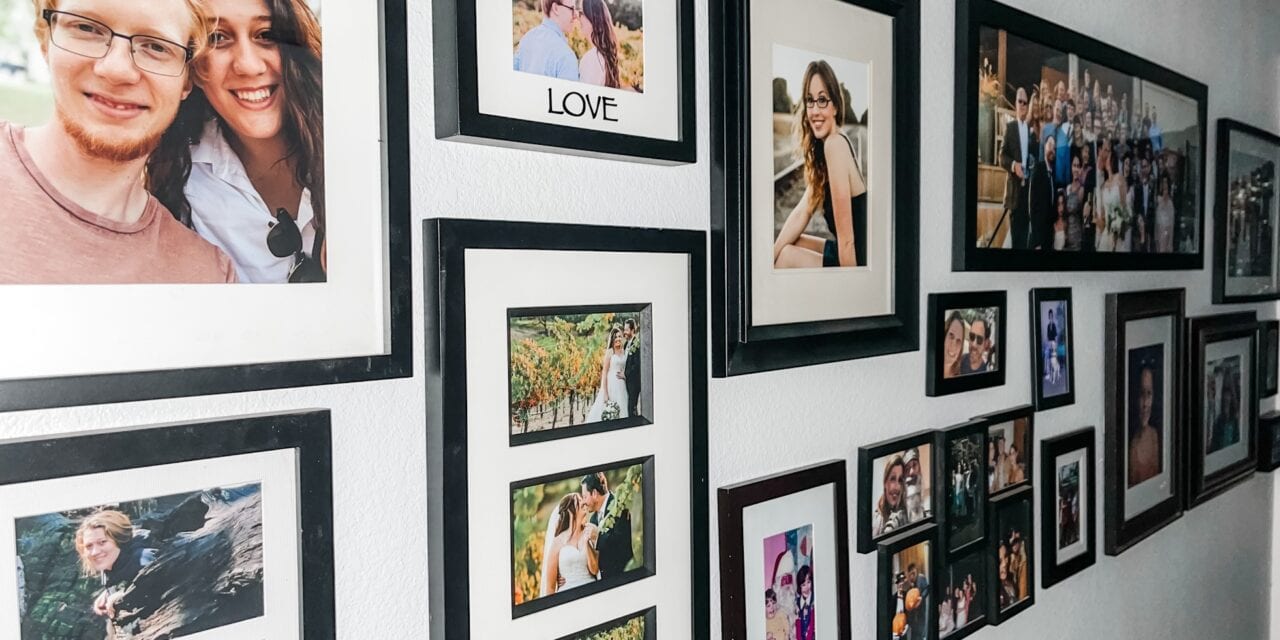
Before Social Media, the photos shrouding your walls were how told your story. And just like Social Media, the framed pictures were of happy people in happy times. Regardless of what was happening at the moment, you could reminisce with an orchestrated life framed in still pictures. And for the older ones in the crowd, pulling down photo albums to share with friends could recreate emotions while sharing happier times of the past. Now, those moments are instantaneous as smartphones upload in real-time but are sadly dismissed as soon as the next post is generated. There’s something about actual pictures, hanging on a wall, that acts as a subliminal reminder of the people and events in your life that mean something. Taking 20 selfies to get the perfect shot does well for your image, but the goofy, eyes closed, candid picture your mom took on your 12th birthday is priceless.
I’ve always loved looking at other people’s pictures. Spending an afternoon with a friend and admiring the pictures hanging on the wall of their life. They choose to let you into their private world of baby photos, trips to Disneyland, and awkward school photos. It was a privilege to see their life, as years of family, friends, and places adorned their walls. I still enjoy everyone’s photos, a voyeuristic peek into how other people live. And I love adorning my home with the best memories that bring a smile to my face every time I pass them in the hall. Old black and white pictures of my parents as children, and the even more rare ones of grandparents from the 1940s.
I’ve always had more framed pictures than I have wall space. Deciding which ones to put up is hard. Because really, I want them ALL. The concept of a photo gallery wall isn’t new, but the design esthetic should keep up with the times. At some point in the 90’s, photo frames were really decorative with kitschy ceramic flowers and all sorts of knick-knacks glued to the frame. Oak frames were standard and cringe-worthy family photos from JC Penny’s or Sears were on everyone’s walls. The motley group of frames contributed to the design of the times. Fast forward to today and a clean esthetic, similar frame style and material, and even an entire wall of a single event are what scatter the pages of Pinterest.
I have an unhealthy obsession with all my photos and I have all the pictures I’ve ever taken, dating back to 1985 when Santa brought me my first 110 camera for Christmas. I have boxes and boxes of Photomat envelopes, and Walmart “Free Doubles Day” pictures. I still have photo albums galore with a million pictures of school friends and probably too many albums of my daughter, as a baby doing the same thing, but in different outfits. (Really, how much activity can you get from a 3-month-old?) This generation will never know the pain of only being able to buy film in a 12 or 24-photo option. Or the expense of developing said film, only to discover they’re blurry, double-exposed, or worst of all – a picture of your fingers covering the lens. But the world has evolved, so YAY for smartphones and instant re-do’s!
")
")
On Display Now
Designing your space
")
Simple and clean
")
Multiple Matted pictures give a cohesive look
")
Group different shaped frames together
Coming Up
Tips for the perfect layout

")
Frame your space
The idea is to frame the outline of all the photos you plan on hanging. Whether it’s up a staircase wall, or above your sofa. Use string and tape (or push pins) and outline the area for your picture frames. Running a piece of string parallel to the slope of your stairs will assure the bottom and top of every frame are in alignment. Taking string to surround the area, creating a box, and making sure each picture fits within that box will give you a clean look.


Matchy-Matchy
The easiest way to get a clean and streamlined appearance is to use the exact same frames for all the photos on your gallery wall. Using black or white frames is a contemporary finished look, using painted frames of various colors will appeal to the artistic ones in the crowd.
next
Similar frame style
")
")
Consistent Style
If bright and fun colors are your thing, or if laid-back coastal is more your pace, using a similar style frame is always a winning game plan. Take inspiration from the interior design of your home. Are you a minimalist? Limit your wall space to a few large prints with streamlined frames. Farmhouse? Various wooden frames of different sizes and thicknesses sitting on a long wood shelf would look great! Traditional or colonial would benefit from matted framed pictures or even more ornate and vintage frames. And of course, we all know someone who covers an entire wall with a mish-mash of photos and that is an artistic statement all its own!
Whatever your style, bringing in photos of memories that make you smile is another element of making your house a home. My husband is in the Real Estate world and is surrounded by unoccupied perfectly staged homes. While they’re beautiful and the furniture is sized and arranged to best fit the space, the family photos are generally lacking. So as far as he knew, nice houses only had selective artwork. Which isn’t going to happen with a wife who has an unlimited supply of pictures. He eventually came around to my way of thinking and seems ok now surrounded by bits of pieces of our life in frames. Or he just decided it was a losing battle. Either way, the house feels homey and we’re both happy!
")


Hanging your photos
Hanging photos doesn’t have to leave behind a wall full of holes and scuff marks. (but don’t worry if it does, a little spackle and paint will have things good as new in no time!) The options are numerous for wall hanging kits or go old-school basic with a nail in the wall. The type of wall will determine your hanging process. A brick wall can be challenging while finding the stud behind your drywall is gold! The size and weight of your artwork will change the hardware needed, as well.
Hardware options I love


Easy Gallery Wall
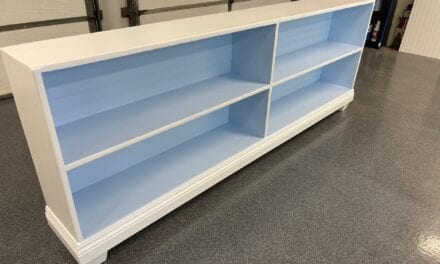
Ok, I admit sometimes I feel like I’m cheating to make things easier. “Work Smarter, Not Harder” is always a great motto! So for the end of our hallway, I wanted to create something special without a ton of effort. I saw a lot of great ideas online for building and staining your own shelves, thought about all the other projects going into the house remodel, and decided to buy premade shelves from Amazon and accomplish the same thing!
I chose shelves that came closest to fitting in the space, and ones that had a lip so the pictures wouldn’t slide off. Because I have tons of framed pictures that I’ve saved throughout the years, I store them in a large plastic tub and can change out the pictures any time I want. Giving us a different wall of memories month to month. The doorway to the bedroom was my only concern. It was super close to the wall. I had less than 2″ of space between the wall and the door trim. I couldn’t encroach into the doorway itself, so I searched for the most narrow shelves I could find that would still fit photos that could overlap, without interfering with the door opening. I found these shelves on Amazon and they were a great price, to boot!
What I did wrong
- I made the mistake of starting too high up from the floor for the bottom shelf, which made the top shelf just a little too high and close to the ceiling. My lazy solution was to remove the top shelf, so now I have three. The right way to have fixed it would have been to take them all down and start over. Sometime’s life is too short for perfection, so I went the easy route.
What I did right
- Each shelf is exactly 18″ apart and perfectly level. I installed each shelf using drywall anchors and screws, so I can add the heaviest pictures I own and nothing will fall down. Seriously, a small child could probably use them like a rock climbing wall! I mixed and matched different sizes and frame styles, overlapping them to give it a nice relaxed (and not too perfect) feel.
")
")
")


I had everything finished and then a year later decided it needed more color. So I took it all down and gave it a fresh update. Big improvement and I’m so much happier!
")
")
")
the hallway: Before and After
")
")
what’s next?
the only limit is your imagination
When displaying your photos use bookcases, shelving, wall space, or any nooks and crannies that are crying for a personal touch. Remember that those pictures represent the best times of your life, the fondest memories, and family that may not be around any longer. Memorialize those days, as often as you can!
")
2 Comments
Submit a Comment
Blog
Latest Blogs

Freshen Up For Spring With A Bright & Cheerful Home
Refresh your home with spring decor, spring cleaning, and a bright new season to cheer you up after a long winter of hibernation.

Casual Home Design
Soft and comfortable. Natural and relaxed. Lived in and refined. Modest and chic. The Casual Home Design is a comforting warm embrace to come home to each day and one that we just can’t get enough of.

3 Simple New Year’s Resolutions That Will Make You Happier
How to keep and maintain your New Year’s Resolution. It may be as simple as making the RIGHT resolution that brings joy and happiness into your life. Stop thinking about what you shouldn’t do, and change your resolution to what you can add into your life to gain more happiness.
This post may contain affiliate links. Danelia Design is a participant in the Amazon Services LLC Associates Program, an affiliate advertising program designed to provide a means for sites to earn advertising fees by advertising and linking to amazon.com. For more information, please read my disclaimer here.


I love the gallery wall on the shelving! We’re thinking about putting in a gallery wall and I’m definitely using your suggestion to use string to outline the space and keep angels parallel. Thanks Janet! We’ll keep you posted.
Glad to hear that the trick will come in handy and I’m excited to see your finished wall!